php gpio raspberry pi
Web-управление Raspberry Pi GPIO
В данной статье мы рассмотрим управление входами/выходами (GPIO) микрокомпьютера Raspberry Pi через Web-интерфейс. Это дает возможность управлять различными устройствами через интернет.
Особенности данного проекта:
— серверная программа, запущенная на Raspberry Pi для чтения значений GPIO
— использование MySQL базы данных для хранения состояния GPIO
— использование веб-сервера Apache2 для контроля GPIO через веб-браузер
Итак, первое, что вам необходимо установить на Raspberry Pi, это:
— Apache веб-сервер
— PHP5
— MySQL сервер
— phpMyAdmin (есть русская версия)
Т.к. микрокомпьютер Raspberry Pi работает на Linux-системах, то в интернете полно описаний на русском языке как устанавливать все эти пакеты. Поэтому зацикливаться на этом мы не будем. Есть неплохая инструкция применительно к Raspberry Pi, но на английском языке: почитать.
Настройка базы данных
Для упрощения работы, все действия с MySQL будем делать из оболочки phpMyAdmin.
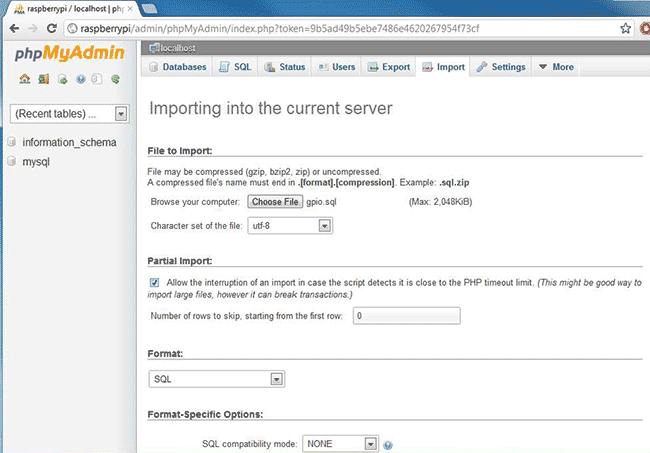
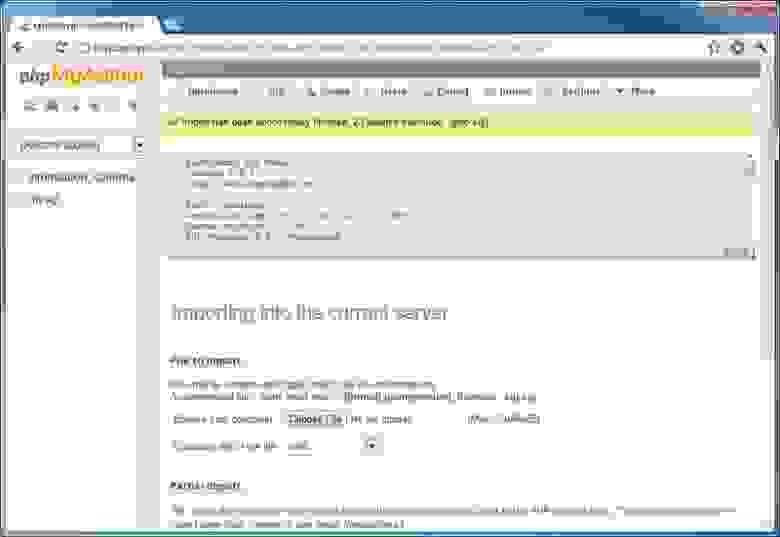
Для начала скачайте данный SQL файл. Он содержит команды для создания базы данных, таблиц и их содержимого. Затем, войдите в phpMyAdmin и в вкладках выберите Import (Импорт). Выберите файл gpio.sql на вашем диске и нажмите кнопку Go для импортирования. После этого, phpMyAdmin создаст БД, таблицы и данные в них.
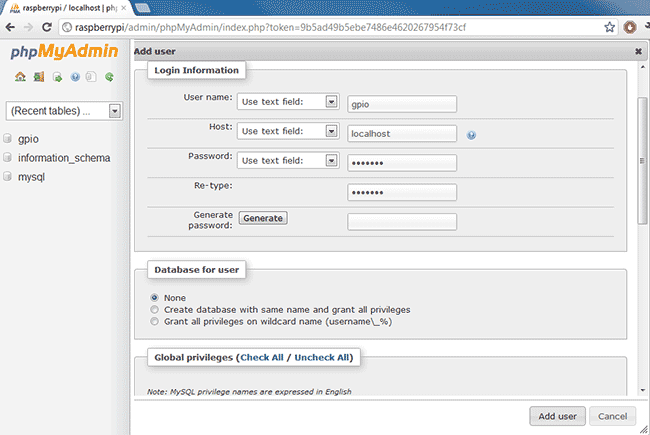
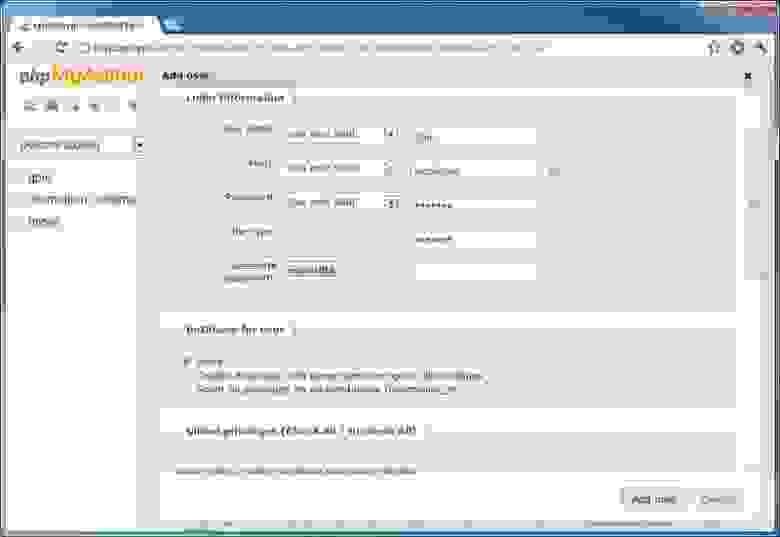
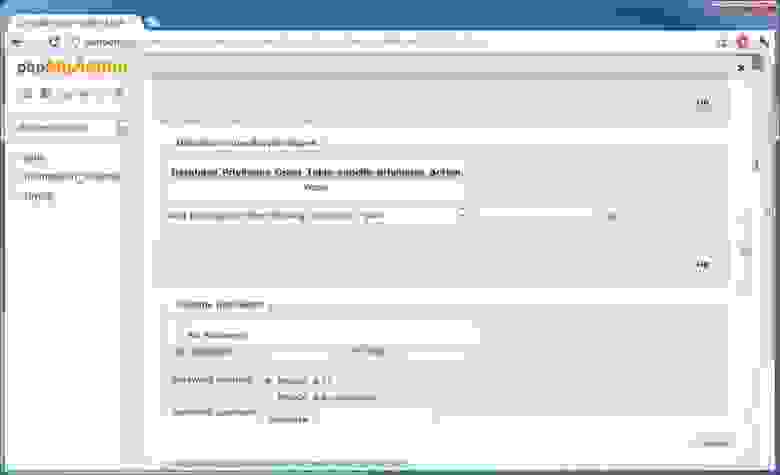
Далее, необходимо создать и добавить пользователя к БД и установить права. Для этого переходим по вкладке Users (Пользователи) и нажимаем ссылку Add User (Добавить пользователя)
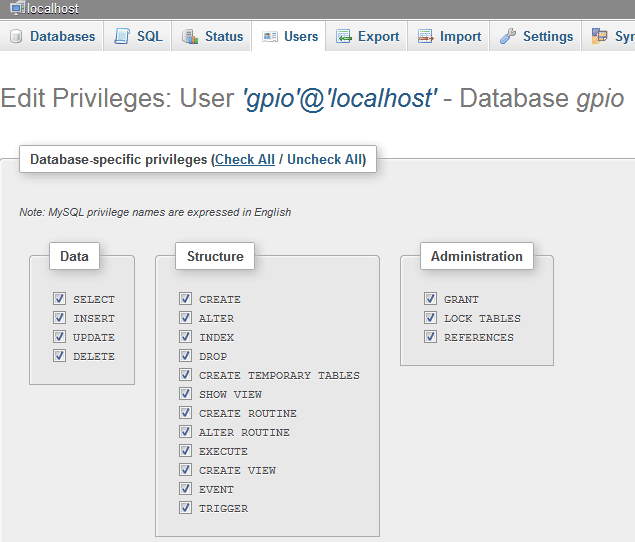
Затем переходим к списку пользователей, находим нашего и нажимаем ссылку Edit Privileges (Редактировать права). В вкладке Database-specific privileges в выпадающем списке находим и выбираем нашу БД gpio. А затем нажимаем Go.
Нажимаем Check All (Выбрать все), чтобы назначить пользователю gpio все права на БД gpio.
На этом установка и настройка БД завершена.
Шелл скрипт
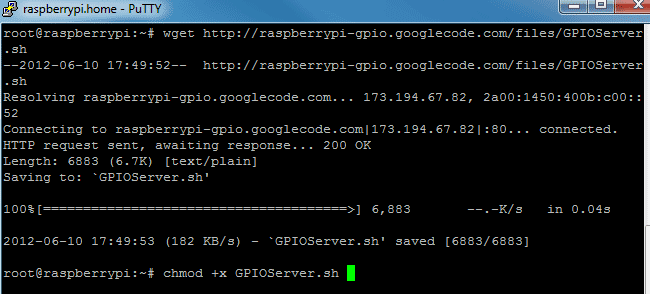
После того, как скрипт скачается, выполните команды установки прав на файл и редактирования скрипта в редакторе nano:
chmod +x GPIOServer.sh
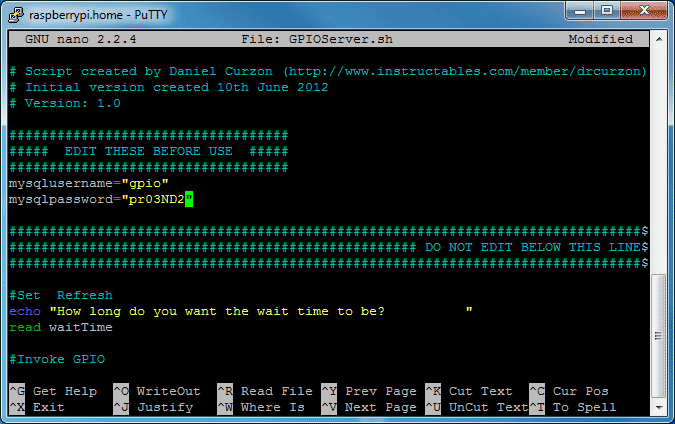
nano GPIOServer.sh
В строки mysqlusername=»USERNAME HERE» и mysqlpassword=»PASSWORD HERE» вы должны вписать имя пользователя (gpio) и пароль к нему.
Затем сохраните изменения в файле нажав ctrl+x, а затем y и ввод.
Настройка Web-страницы
Теперь необходимо скачать файлы для работы веб-интерфейса. Войдите под root’ом и выполните следующие команды:
wget http://raspberrypi-gpio.googlecode.com/files/control.php
wget http://raspberrypi-gpio.googlecode.com/files/off.jpg
wget http://raspberrypi-gpio.googlecode.com/files/on.jpg
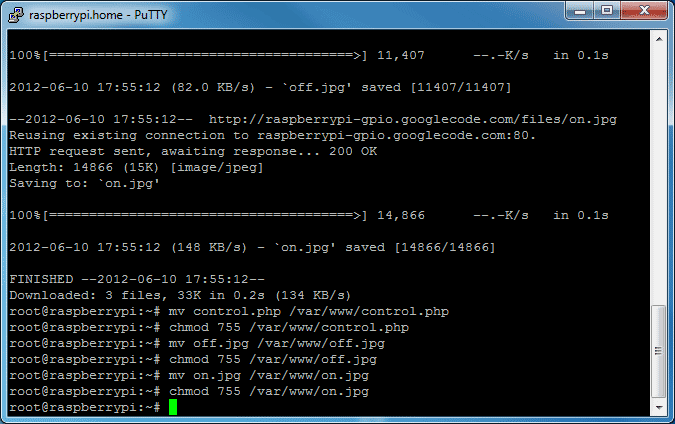
После того, как эти файлы скачаются, наберите:
mv control.php /var/www/control.php
chmod 755 /var/www/control.php
mv off.jpg /var/www/off.jpg
chmod 755 /var/www/off.jpg
mv on.jpg /var/www/on.jpg
chmod 755 /var/www/on.jpg
Этими командами мы переместим файлы в папку www и установим для них соответствующие права.
Далее, необходимо сделать правки в РНР-файле:
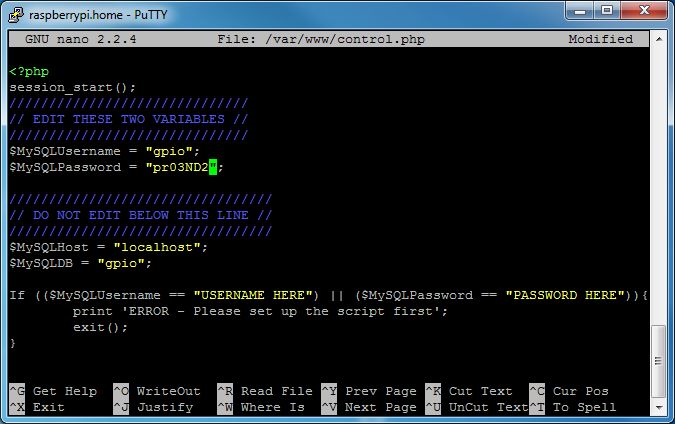
nano /var/www/control.php
Находим следующие строки:
$MySQLUsername = «USERNAME HERE»;
$MySQLPassword = «PASSWORD HERE»;
и вписываем имя пользователя и пароль.
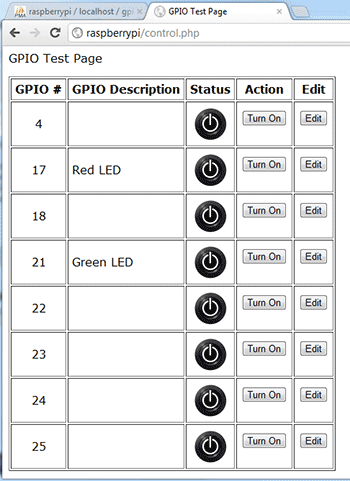
Открываем в браузере файл control.php (у меня полный путь выглядит как http://raspberryPi/control.php)
Если спросит авторизацию, то:
Username: admin
Password: gpio
На этом установка и настройка закончены.
Использование
Для запуска ПО введите следующую команду:
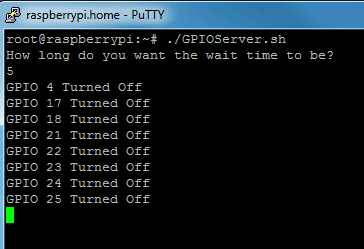
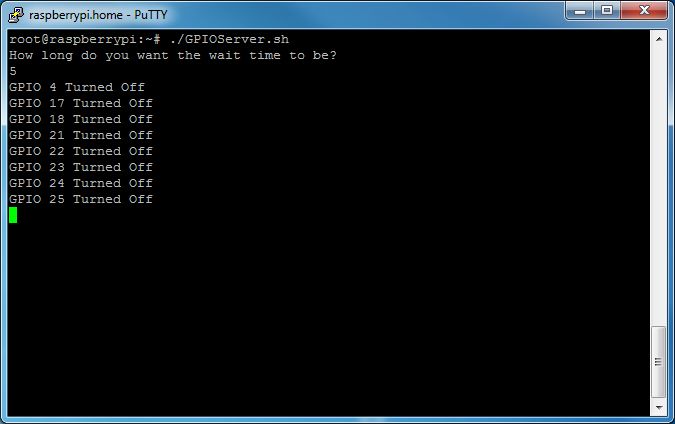
./GPIOServer.sh
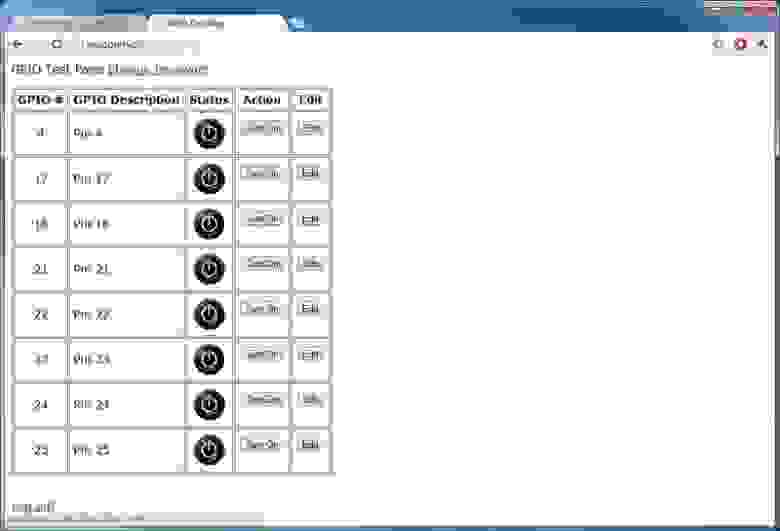
Теперь можно войти в веб-интерфейс http://HOSTNAME/control.php, авторизоваться и пользоваться.
Последнюю версию скриптов всегда можно найти на сайте Google.
Веб-контроль Raspberry Pi GPIO
Доброго времени суток! В этом посте я хочу показать, как управлять электроникой через Интернет используя Raspberry Pi. Выглядеть это будет примерно вот так.
Шаг 1. База знаний
Если хотите узнать, как всё это настроить, вам сюда (инструкция на английском языке).
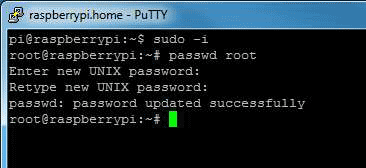
Шаг 2. Создание root аккаунта
Пропустите это, если у вас уже есть аккаунт, а если нет — продолжайте прочтение 🙂
Теперь введите и подтвердите пароль для учётной записи.
Затем нужно закрыть SSH сессии и перезапустить его, войдя в систему как root.
Шаг 3. Настройка баз данных и phpMyAdmin
Это решение основано на базах данных MySQL, сейчас мы их и настроем.
Итак, для начала скачайте этот файл.
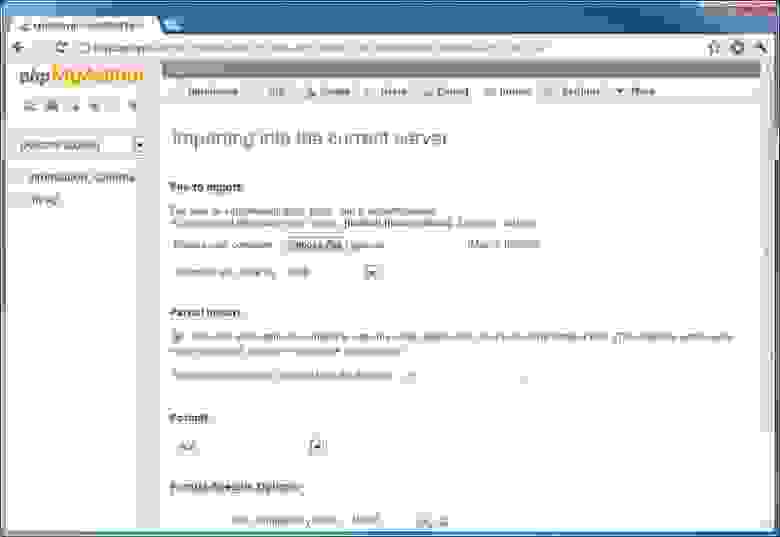
Залогиньтесь в панели управления phpMyAdmin и нажмите кнопку «Import» в верхнем меню.
Теперь, в пункте «File to Import«, нажмите кнопку «Choose File» и выберите файл, который скачали до этого (gpio.sql).
И в завершении нажмите кнопку «Go» внизу страницы.
Это позволит создать все необходимые таблицы.

Шаг 4. Shell Script
Это та часть, которая запускает проверку значений в базе данных MySQL на Raspberry Pi.
Этот сценарий довольно прост, но требует настройки.
После того как всё изменили, удерживайте клавишу Ctrl и нажмите X, затем отпустите Ctrl и нажмите Y. Нажмите Return / Enter.
Шаг 5. Настройка веб-страницы
Финальный шаг, перед тем как вы сможете использовать это, — настройка веб-страницы.
Теперь вам нужно изменить пару переменных перед использованием файла, поэтому напишите nano /var/www/control.php и нажмите Return / Enter.
Сейчас через браузер зайдите на страницу control.php (у меня raspberryPi/control.php, где raspberryPi — имя хоста.)
Там потребуется ввести следующие данные:
Имя пользователя: admin
Пароль: gpio
Я рекомендую нажать на ссылку «Change Password» сверху страницы и сменить пароль по очевидным причинам.
Шаг 6. Использование
Он попросит ввести время ожидания, оно будет зависеть от потребностей ваших приложений. Но, чем короче время ожидания, тем больше ресурсов сценарий будет использовать (я обычно использую 5).
Готово! Теперь войдите в панель управления (http://ИМЯ ХОСТА/control.php) и наслаждайтесь!
Для безопасности следует удалить root аккаунт.
Php gpio raspberry pi
php-gpio is a simple PHP library to play with the Raspberry PI’s GPIO pins.
It provides simple tools such as reading & writing to pins.


[UPDATE Fall 2014] Now compatible with both Raspberry Pi B Model & B+ Revision
General Purpose Input/Output (a.k.a. GPIO) is a generic pin on a chip whose behavior (including whether it is an input or output pin) can be controlled (programmed) through software. The Raspberry Pi allows peripherals and expansion boards (such as the Rpi Gertboard) to access the CPU by exposing the inputs and outputs.
For further informations about the Raspberry Pi’s GPIO capabilities, see docs & schemas at http://elinux.org/RPi_Low-level_peripherals.
For Raspbeery Pi’s GPIO controlling LEDs, have a look at a sample complete circuit diagram for a single LED, with detailled explanations & schemas, here.
For Raspbeery Pi’s GPIO controlling sensors, check the DS18B20 (temperature sensor) in action here
After having installed & wired your LED & resistor on a breadboard, add appropriate modules from the Linux Kernel:
For LEDs, enable the gpio module :
For sensors, enable the appropriate sensor. By example for a DS18B20 1-Wire digital temperature sensor:
To load such kernel modules automatically at boot time, edit the /etc/modules file & add these two lines:
The recommended way to install php-gpio is through composer.
Just run these three commands to install it
Now you can add the autoloader, and you will have access to the library:
If you don’t use neither Composer nor a ClassLoader in your application, just require the provided autoloader:
The API usage requires sudo permissions.
To respect such permissions needs (say, for any web-related usage), see blinker file and the explanations below.
Understanding I/O permissions
Permissions make sense:
Such practices are regularly proposed on RPi forums, but they aren’t security-aware & therefore not recommendable in an Internet environment. Instead, the good old /etc/sudoers file allow your linux users to execute single files with sudo permissions without password to type.
The blinker file solution («one-file-to-blink-them-all»)
In a PHP-based project, the API can only be used with sudo permissions. But there is a solution to avoid exposing your Raspbery Pi to security issues : Preparing & packaging inside an API client, in a single PHP file, the GPIO operation you need to run. In a hardware-based project, such operations are usualy few in number: blink a led, run a servomotor, etc. Such single PHP file containing your GPIO-related action can be called with determinated parameters from within your web-based application using exec() command :
Such one-single PHP file to act as an API client for one GPIO action makes easier to configure specific sudo permissions in your /etc/sudoers file, as you’ll see below. If you have more hardware operations to run (say, a LED + a servomotor + 2-3 sensors), more dedicated API client files, with their own parameters, is also very OK.
This is the regular linux-file-permission-system way to do such things, not a dummy chmod 777 bullshit.
Edit your /etc/sudoers file:
Then add this two lines in your /etc/sudoers file :
Replace /path/to/the/blinker with your single API client PHP file.
The blinker file provided now has the sufficient permissions & is ready to use the GPIO API. You do not need to install apache2-suexec nor suPHP.
You can test the blinker file solution with the blinkerTest.php file provided here:
Some php-gpio api examples / demo :
php-gpio is released under the MIT License.
See the bundled LICENSE file for details.
You can find a copy of this software here: https://github.com/ronanguilloux/php-gpio
About
A PHP library to play with the Raspberry PI’s GPIO pins
Php gpio raspberry pi
PHP script to control Raspberry PI GPIO pins from the web. Raspberry Pi Web GPIO should work from any modern mobile or desktop browser, but this hasn’t been tested.
Copy all files into your web directory.
Run the setup script
Make sure the file has execute permissions.
Run the script, It detects the Raspberry Pi’s board revision, imports the tables into the database, installs the gpioserver into /etc/init.d and makes changes to db.php
Load the script in your browser/mobile device.
Default login information
Original idea and code
Password Hashing with scrypt
Redistributions of source code must retain the above copyright notice, this list of conditions and the following disclaimer. Redistributions in binary form must reproduce the above copyright notice, this list of conditions and the following disclaimer in the documentation and/or other materials provided with the distribution. THIS SOFTWARE IS PROVIDED BY THE COPYRIGHT HOLDERS AND CONTRIBUTORS «AS IS» AND ANY EXPRESS OR IMPLIED WARRANTIES, INCLUDING, BUT NOT LIMITED TO, THE IMPLIED WARRANTIES OF MERCHANTABILITY AND FITNESS FOR A PARTICULAR PURPOSE ARE DISCLAIMED. IN NO EVENT SHALL THE COPYRIGHT HOLDER OR CONTRIBUTORS BE LIABLE FOR ANY DIRECT, INDIRECT, INCIDENTAL, SPECIAL, EXEMPLARY, OR CONSEQUENTIAL DAMAGES (INCLUDING, BUT NOT LIMITED TO, PROCUREMENT OF SUBSTITUTE GOODS OR SERVICES; LOSS OF USE, DATA, OR PROFITS; OR BUSINESS INTERRUPTION) HOWEVER CAUSED AND ON ANY THEORY OF LIABILITY, WHETHER IN CONTRACT, STRICT LIABILITY, OR TORT (INCLUDING NEGLIGENCE OR OTHERWISE) ARISING IN ANY WAY OUT OF THE USE OF THIS SOFTWARE, EVEN IF ADVISED OF THE POSSIBILITY OF SUCH DAMAGE.
About
PHP script to control Raspberry PI GPIO pins from the web
Php gpio raspberry pi
Just finished coding up a basic GPIO interface in PHP.
I’ll be using it as a simple way to test out GPIO based devices such as controlling my Cybot (old make-it-yourself robot) via the PI.
I am unsure how it would work by using it in an webpage, I have’t tested that yet. But technically it should work I think.
I hope it helps someone out.
Re: PHP GPIO Library
Hi, nice work, it seems to work quite well, however needs root/permissions to write to those files.
I want to use this as a front-end for an HAVAC control unit.
Obviously I don’t want the apache process to run as root, any ideas how to handle this?
Re: PHP GPIO Library
Re: PHP GPIO Library
You’d be a hero in the RPi world if you did.
The amount of potential that would open up is huge.
I’d have a go myself but have no idea where to start. any pointers? Guess I could start by looking at the python wrapper.
Re: PHP GPIO Library
Re: PHP GPIO Library
I have installed the two items WiringPi and WiringPi-php. I had a bit of a challenge getting the php module to install but sorted it out when I moved the wiringPi into the WiringPi-php directory.
When I manually activate the pins via
$ gpio mode 1 out
pi@raspberrypi
$ gpio write 1 1
pi@raspberrypi
I am able to read the 3.3v using a multimeter.
Now when I try to do it via a php script I can’t change the state of the pin.
When I run this script I get:
I am not sure how to know if the php is actually working. Could you offer up some ideas on how I can trouble shoot this.
Re: PHP GPIO Library
Re: PHP GPIO Library
bircoe wrote: Hi, nice work, it seems to work quite well, however needs root/permissions to write to those files.
I want to use this as a front-end for an HAVAC control unit.
Obviously I don’t want the apache process to run as root, any ideas how to handle this?
You can fix the permissions by using the gpio program in wiringPi to do the exports for you.
So, if wanting to use pins 17 an 18 for output and 4 for input, then:
Run the command gpio exports to check what’s what.
then you can run your PHP program as the same user you used for the gpio program, as it changes ownership for you.
If writing your own stuff in php, or any language to use the GPIO via the /sys/class/gpio interface, then open the files once and cache the file-desriptior. Going through an open/read/close sequence is even slower.. not always possible in php behind apache though.
However also see the php bindings for wiringPi on github: https://github.com/wiringPi
Re: PHP GPIO Library
Does WiringPi-PHP works for anyone?
I’ve tried to use it, but it does nothing. Even included test.php is not working as it should for me.
Also
Re: PHP GPIO Library
janek wrote: Does WiringPi-PHP works for anyone?
I’ve tried to use it, but it does nothing. Even included test.php is not working as it should for me.
Also
Re: PHP GPIO Library
janek wrote: Does WiringPi-PHP works for anyone?
I’ve tried to use it, but it does nothing. Even included test.php is not working as it should for me.
Also
I’ve not been in-touch with the chap who did the PHP bindings for wiringPi for a while now. I wonder if it’s time I looked at it myself.
However, if you want to do it the «hard» way, then you can use the GPIO program (vi system ()) to export the pins, then open/read/write/close the files in /sys/class/gpio etc. It’s probably fast enough for most needs without having native PHP functions to do it all.
I know how to control the GPIO pins throught the command line, like::
echo out > /sys/class/gpio/gpio0/direction #set gpio 0 pin to output
echo 1 > /sys/class/gpio/gpio0/value #lights on at gpio 0
echo 0 > /sys/class/gpio/gpio0/value #lights off at gpio 0
Re: PHP GPIO Library
bitbitbit wrote: [
I know how to control the GPIO pins throught the command line, like::
echo out > /sys/class/gpio/gpio0/direction #set gpio 0 pin to output
echo 1 > /sys/class/gpio/gpio0/value #lights on at gpio 0
echo 0 > /sys/class/gpio/gpio0/value #lights off at gpio 0
You can manipulate the GPIO from the command line with the gpio command, so the above becomes:
So at that level you could crudely use php’s system() command to call the gpio program.
To take that into PHP, you could firstly use the gpio’s export function to export the GPIO pins:
then you can open and write the /sys/class/gpio/. files from your PHP program.
